Secure Apache with Client-Authenticated TLS Handshake
- What is a client-authenticated TLS handshake?
- OpenSSL
- Generate a random password
- Certificate Authority
- Server
- Client
- Configure Apache
- Configure the browser
- Curl test
- Backup
- Makefile
- Public Key Cryptography
What is Client-authenticated TLS handshake?
A client-authenticated TLS handshake is one where both parties authenticate each other.
In layman terms, it’s like HTTPS but when you try to access, the server asks you to prove your identity presenting a certificate. It looks like this:

Usually, your certificate has been issued by an authority trusted by the server. In this tutorial I intend to secure a private server for my exclusive access. Thus, I’ll be creating certificates and keys for my authority, server, and client.
Now you can read a mini refresher on public key cryptography, inspect the code that generates the certificates, or keep reading to begin the setup.
OpenSSL
OpenSSL is a library that implements TLS, SSL, and general-purpose cryptographic utilities. It has two main forks: LibreSSL, BoringSSL. The main OpenSSL man page may give you an idea of the functionality included.
This tutorial is written for OpenSSL version 1.1.1. Previous versions would require significant changes. Install 1.1.1, add it to the path, and check it is version 1.1.1.
brew install openssl@1.1
echo 'export PATH="/usr/local/opt/openssl@1.1/bin:$PATH"' >> ~/.bash_profile
source ~/.bash_profile
openssl version
Generate a .rnd file in your home folder with random content.
cat /dev/random | head -c 1024 > ~/.rndWhat’s the .rnd file? While using OpenSSL you may get an error “PNRG not seeded”. This means it can’t access a .rnd file in the home folder. On systems without a good random generator, OpenSSL generates entropy from other means, one of them is reading random bytes from this file. macOS has a random generator of cryptographic quality, but OpenSSL still complains. I ignore why.
Why do you need to install OpenSSL? In macOS Apple uses Common Crypto instead OpenSSL, because the later doesn’t provide binary compatibility between versions. This article explains further. AFAIK, there isn’t a terminal command to this library, but even if it was, it would have to be much nicer to compete with the well known OpenSSL. By the way, Common Crypto is a C library, but Swift 4.2 ships with a CommonCrypto module that bridges the library directly to Swift. Another way of using it in Swift is through IDZSwiftCommonCrypto, a third party wrapper.
Where is the OpenSSL configuration file? It’s at /usr/local/etc/openssl/openssl.cnf.
Generate a random password
I need a password from 4 to 1023 characters to protect the private keys. There are several one-liners to generate passwords of cryptographic quality. They all generate entropy using a hash implementation, or a pseudorandom generator. Then they discard non ASCII characters, and finally cut the amount of bytes needed.
Generate a random password with 32 characters:
cat /dev/random | base64 | head -c 32 > passphrase.txtcat /dev/random generates an unlimited amount of random bytes. It is passed to base64, which encodes that information using a 64 character alphabet. The head command gets the first 32 characters and discards the rest. The output is piped to a file.
In Unix systems, /dev is a virtual file system that exposes device drivers as files of the filesystem. The random device driver is actually a pseudorandom generator.
Certificate Authority
Generate a private key
|
|
Run openssl genpkey -help for details.
| |
Why 4096 bits?
The standard key sizes today are 2048, and 4096. Given the increasing computational power, the NIST recommends 4096 bits for keys used beyond 2031 (see Should We Start Using 4096 bit RSA keys?, or NIST Recommendation for Key Management, Part 1. So basically, in the unlikely event that your key will be active beyond 2031, no system will complain that it is too weak if you used 4096 bits. The downside is that it will require a bit more CPU.
What is PEM?
PEM is a container format for certificates, private keys, and root certificates. It usually has extensions .pem, .key, or .cer. PEM stands for Privacy Enhanced Email. It was defined in RFCs 1421, 1422, 1423, 1424. It didn’t succeed as a way to secure mail, but it is still in use as a container format.
What is in a key?
The ca-key.pem file contains the attributes of the RSA private key, which are: modulus, public exponent, private exponent, prime1, prime2, exponent1, exponent2, and coefficient. These many numbers are suitable to speed up RSA calculations using the Chinese Remainder Theorem.
These elements are encoded in ASN.1, which is a cross-platform way of expressing data structures. Then the ASN.1 is encoded to binary in DER format, and then it is encoded again in PEM, which is a base64 version of the DER. In summary: attributes + format metadata → ASN.1 → DER → PEM.
You can dump the key back to ASN visiting this website, or using your terminal: openssl asn1parse -i -in ca-key.pem. You will see the metadata, but the key itself shows as a large number because it was encoded in Triple DES. Decoding this number would show the ASN.1 PKCS#1 structure for the PKCS#1 format.
To skip the ASN.1 and see the attributes in plain text, run:
openssl rsa -text -noout -in ca-key.pem -passin file:passphrase.txtGiven how the RSA algorithm works, the attributes of the private key can be used to create the PEM public key:
openssl rsa -in ca-key.pem -pubout -passin file:passphrase.txtGenerate a certificate
Create a subject:
export SUBJECT="/C=ES/ST=Madrid/L=Madrid/O=Jano/OU=Org/CN=jano.dev" Create a certificate request and a certificate:
|
|
Run openssl req -help for details.
| |
If you are on macOS, add the certificate and trust it:
cp ca-crt.pem ca.crt
sudo security add-trusted-cert -d -r trustRoot -k /Library/Keychains/System.keychain ca.crt
This will create a certificate entry in the section System of the keychain with name jano.dev. Its icon (as of macos 12.6) is golden to indicate this is a Root certificate authority. If it appears as untrusted, close and open the keychain app and it will become trusted.
What is in a subject?
C |
The city where your organization is located. |
ST |
The state/region where your organization is located. |
L |
The city where your organization is located. |
O |
Legal name of the organisation. |
OU |
The division of your organization handling the certificate. |
CN |
A fully qualified domain name (FQDN). This is either the real name of a person, or the hostname of a computer. |
Server
Create the SSL.conf file
Create a file with name ssl.conf and the following content:
[ req ]
req_extensions = req_ext
distinguished_name = req_distinguished_name

[ req_distinguished_name ]

[ req_ext ]
subjectAltName = @alt_names

[alt_names]
DNS.1 = jano.dev
This is the minimal file that will let you generate a certificate with a SAN. AFAIK you can’t replace it with command line options. Note that the DNS.1 entry is my server name. If you need more domains, add each on a new line with prefix DNS.2, DNS.3, etc.
What is SAN?
SAN stands for “Subject Alternative Name”. It is a way to generate a certificate that may be use with multiple domains, like lingcars.com, blog.lingcars.com, etc. Not long ago, if the SAN was not present, the CN was used as a fallback. Since Chrome 58, a certificate without SAN fails with the misleading error NET::ERR_CERT_COMMON_NAME_INVALID.
Create a key and certificate request
Generate the private key and certificate request:
|
|
Run openssl req -help for details.
| |
What is a certificate request (CSR)?
It’s a petition to the CA to create a certificate that proves your identity. The CSR contains some personal information like your name, and also your public key. It’s up to the CA to verify that you are indeed who says in the certificate. This usually requires an official document like your passport or similar. The CA will then generate a certificate containing your personal information and public key, and sign it. If a browser trusts the CA, it will also trust that this certificate has been awarded to the company or person that matches the information contained on it.
The CSR information is encoded as ASN.1 according to the PKCS #10 specification. You may print the certificate request and verify it has a SAN:
openssl req -text -noout -in jano.csrNote that I passed the subject information with a -subj option. Without it, the command would ask for it in an interactive manner, but for that it needs the following template in the req_distinguished_name section of the configuration file. It contains the questions, and their default values.
[ req_distinguished_name ]
countryName                    = Country Name (2 letter code)
countryName_default            = ES
stateOrProvinceName            = State or Province Name (full name)
stateOrProvinceName_default    = Spain
localityName                   = Locality Name (eg, city)
localityName_default           = Madrid
organizationName               = Organization Name (eg, company)
organizationName_default       = Jano
organizationalUnitName         = Organizational Unit Name (eg, section)
organizationalUnitName_default = HQ
commonName                     = Common Name (e.g. server FQDN or YOUR name)
commonName_max                 = 64
commonName_default             = jano.dev
Create a certificate
Generate the certificate:
|
|
Run openssl help x509 -help for details.
| |
Check that the certificate has a subject alternative name. In macOS you can preview the certificate selecting it and pressing space. From the terminal you may display the certificate with:
openssl x509 -text -noout -in jano.crtClient
Same thing we did with the server. It doesn’t really matter what you put in CN and alternate name, but I’m changing it to “Notes user”.
Configure Apache
If you are using Lightsail and you configured Let’s Encrypt you will have a file at
/etc/apache2/sites-available/000-default-le-ssl.confIts contents are:
<VirtualHost *:444>
    CustomLog ${APACHE_LOG_DIR}/access444.log combined
    DocumentRoot /var/www/notes
    ErrorLog ${APACHE_LOG_DIR}/error444.log
    LogLevel warn
    ServerAdmin jano@jano.dev
    ServerName jano.dev

    SSLEngine On
    SSLProtocol all -SSLv2 -SSLv3
    SSLCipherSuite          ECDHE-RSA-AES128-GCM-SHA256:ECDHE-ECDSA-AES128-GCM-SHA256:ECDHE-RSA-AES256-GCM-SHA384:ECDHE-ECDSA-AES256-GCM-SHA384:DHE-RSA-AES128-GCM-SHA256:DHE-DSS-AES128-GCM-SHA256:kEDH+AESGCM:ECDHE-RSA-AES128-SHA256:ECDHE-ECDSA-AES128-SHA256:ECDHE-RSA-AES128-SHA:ECDHE-ECDSA-AES128-SHA:ECDHE-RSA-AES256-SHA384:ECDHE-ECDSA-AES256-SHA384:ECDHE-RSA-AES256-SHA:ECDHE-ECDSA-AES256-SHA:DHE-RSA-AES128-SHA256:DHE-RSA-AES128-SHA:DHE-DSS-AES128-SHA256:DHE-RSA-AES256-SHA256:DHE-DSS-AES256-SHA:DHE-RSA-AES256-SHA:AES128-GCM-SHA256:AES256-GCM-SHA384:AES128-SHA256:AES256-SHA256:AES128-SHA:AES256-SHA:AES:CAMELLIA:DES-CBC3-SHA:!aNULL:!eNULL:!EXPORT:!DES:!RC4:!MD5:!PSK:!aECDH:!EDH-DSS-DES-CBC3-SHA:!EDH-RSA-DES-CBC3-SHA:!KRB5-DES-CBC3-SHA
    SSLHonorCipherOrder on
    SSLCompression off
    SSLOptions +StrictRequire

    SSLCACertificateFile "/etc/apache2/client-certs/ca.crt"
    SSLCertificateFile /etc/apache2/client-certs/jano.crt
    SSLCertificateKeyFile /etc/apache2/client-certs/jano.key
    SSLVerifyClient require
    SSLVerifyDepth 5

    # Add vhost name to log entries:
    LogFormat "%h %l %u %t \"%r\" %>s %b \"%{Referer}i\" \"%{User-agent}i\"" vhost_combined
    LogFormat "%v %h %l %u %t \"%r\" %>s %b" vhost_common
</VirtualHost>
What these all mean?
SSLVerifyDepthis the maximum number of intermediate certificate issuers to be followed while verifying the client certificate.- 0 means self-signed client certificates are accepted only
- 1 means the client certificate can be either self-signed, or signed by a CA which is directly known to the server (i.e. the CA’s certificate is under SSLCACertificatePath).
SSLVerifyClientrequire will require a SSL certificate before processing the request.
See Apache Module mod_ssl for reference.
Configure the browser
Convert certificate to PKCS12 format. Don’t leave the password blank as it may cause problems when importing to macOS keychain.
openssl pkcs12 -export -out client.pfx -inkey jano.key -in jano.crt -certfile ca.crt -passout file:passphrase.txt
pbcopy < passphrase.txt
open client.pfx
Note that pbcopy is copying the passphrase to the clipboard. Be mindful of when the keychain asks for your administrator password or for the passphrase of the certificate.
If you get a invalid password error in this step, it may be that you are using OpenSL 3.x, which as a pkcs12 algorithm that is not compatible with macOS. See SO answer. The fix is to downgrade to openSSL 1.1. Try for instance:
brew reinstall openssl@1.1
export PATH="/opt/homebrew/opt/openssl@1.1/bin:$PATH"
openssl version
This should output OpenSSL 1.1.1q 5 Jul 2022. Now repeat the generation of the pkcs12:
openssl pkcs12 -export -out client.pfx -inkey jano.key -in jano.crt -certfile ca.crt -passout file:passphrase.txt
pbcopy < passphrase.txt
open client.pfx
In macOS
In macOS drag and drop the following files in the login section of your keychain.app: ca.crt, client.pfx. Then open the ca.crt entry (it’s the one with the orange icon) and choose Trust Always.
In iPhone
In iPhone send by mail: ca.crt, client.pfx, passphrase.txt. Save the files to the iCloud drive, then go to Files in your iPhone and open both. Then go to Settings > General > About > Certificate Trust Settings, and trust Jano CA. I find that this works well and never asks for certificates again.
In Safari
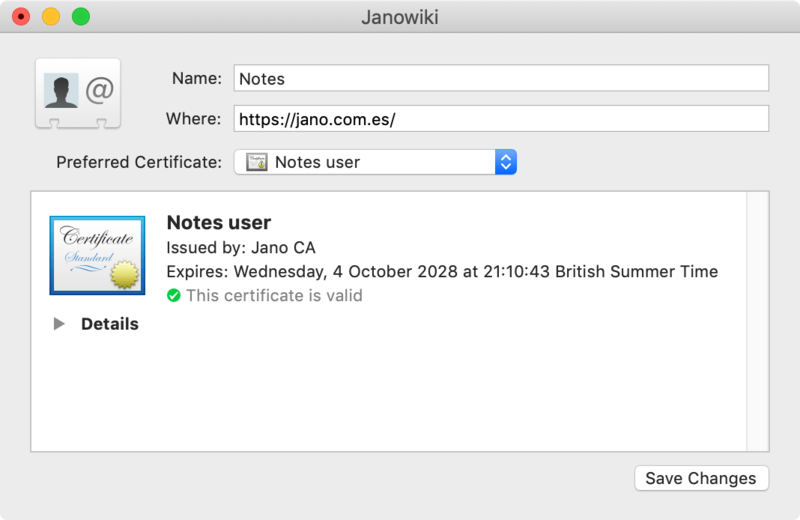
In Safari open a page and you will get a dialog prompt you to choose a certificate. Safari will ask you again on any URL you visit and store your choice in the Keychain. This creates a preference item per URL. However, you can alter these choices to apply to the whole site. Do the following:
- Open the keychain, select All Items, in the search bar start typing the URL you were visiting (e.g.
https://jano.dev). You should be able to see a identity preference item. Open it. - On the identity preference item set the field Where: to
https://jano.dev/(don’t forget the trailing slash). The Preferred certificate should already point to the certificate you chose before.
In Firefox
In Firefox go to Firefox > Preferences… > Privacy & Security
- In Certificates choose Select one automatically
- Click View Certificates…
- In the tab Your Certificates click Import… and select the client.pfx file. The password to open it is in the file passphrase.txt.
- In the tab Servers click Import… and select the file ca.crt.
- In Chrome we don’t have to do anything. It reads the CA from the keychain. However, it asks us to select a certificate once per session.
Curl test
Test that you can’t access without certificate:
curl https://jano.dev:444 -vTest that you can access with the certificate:
curl https://jano.dev:444 --key jano.key --cert jano.crt --cacert ca.crtBackup your files
Obviously, zip all the files you generated and keep them in a safe place. For instance, 1Password.
Makefile
This gist has a Makefile and two configuration files. It automates most things contained in this article. If you intend to use it, you will have to configure your remote Apache manually, and change the domain name in the script. Happy reading. If you don’t understand anything, refer to this article.
Public Key Cryptography
Usually, the HTTPS protocol performs a TLS handshake that creates a secure channel of communication. This means that communication between server and browser is private (no one else can snoop), reliable (information can’t be altered), and authenticated (the server identity is verified).
This is possible thanks to public key cryptography, which is a procedure to generate two keys for each entity involved in a conversation. These keys are called public and private key, and have the following properties:
- The public key is able to decrypt a message encrypted by the private key.
- It’s practically impossible to guess one of the keys by examining the other.
- Both keys of a given pair are unique. There isn’t a third key able to replace either of the two.
If you think about it, this leads to the following use case scenario:
- I encrypt a message using the private key.
- I keep my private key hidden, but I distribute my public key to everyone.
- Since everyone has my public key, they can use it to decrypt my messages.
- Since no one has my private key, I’m the only one able to create messages that the public key can decrypt.
- Therefore people can check if I’m the author by attempting to decrypt my messages. If they succeed it means I’m the author.
But, how do you know the public key was mine on the first place?
- All internet browsers include the public key of the main “Certification Authorities”.
- Let’s say I just generated a public/private pair and I want people to verify my identity.
- I send my public key to the CA attaching legal documents that confirm my identity. The CA sends me back a message signed by their private key saying “Here is the public key of a guy called John Doe: 9D306BA967C…”.
- Since you trust the CA, you can verify that my public key is owned by a guy called John Doe.